Setting the correct base is what’s important for every make-up look. Such as, dry skin would need a lot of moisturizers to make their skin look flawless all day long. Now, if we talk about oily skin or combination-oily skin they need to preps there face with the help of water-based moisturizer. Therefore both make-up looks are completely different and need different products and to work with, that being said. Let’s get on with today’s post expressing what is required to cover the pores and have a matt finish look all day long for the oily skin peeps.
Water-Based Moisturizer

It is a super essential step for all the oily skin people. There are tons of girls who don’t even apply the cream on their faces as they have oily skin. This is a completely wrong method of doing make-up. You need to apply a water-based moisturizer to your face. Believe me on this one thing, if your body is not hydrated well you will see excessive oil dripping off your face. You will not be able to get anywhere close to the matt look so moisturizer your face. If you have not applied moisturizer before and you have begun to do so now, just observe how much of the moisturizer will be soaked in your skin for the first week then you will find the difference.
Primer

Primer is basically to clog your pores, thus use it just where you have visible pores so that it could cover it. The combination skin can work with it only on their T-zone as this is the place where you get most oily. Once you have got the primer, apply face powder. Yes, you need to have a matt look. You got to take some compact powder in the puff dab it to your skin. This will give an even skin without any visible pores.
Foundation

Before you, dab foundation on various parts of your face with a brush, use a make-up blender. Damp it and start using after applying a little product on it. Focus on an area at a time don’t just dab the product everywhere and then blend it. Apply it on one side of your cheek and spread it outwards. Once you have done the cheek do the forehead, the chin, the nose, etc.
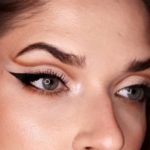
Concealer

Applying one tone lighter concealer than the foundation to your under-eye area. This will give a nice blend and add some brightness to the under-eye. This makes you appear much better and have a sort of natural look. Why do we do this? Because once you have applied eye make-up you will bring some tone of your eye shadow or liner to the lower lid. Doing so our eye make-up appears darker; therefore, applying lighter shade can make your under-eye look brighter.
Bronzer

The next step is of contouring your face with the help of bronzer. The cheekbones and the head are the most common place where we do the contouring. However nose contouring is somewhat difficult. The hack to nose contouring is the use of a brow pencil. Use it to draw two lines on the nose and give a slight curve on the tip. Smudge it using a blender. However, if you find cheek blending difficult. Move the brush in an upward direction and if you have got much of a product then blend it first and move the used foundation brush in a circular direction. Don’t take extra foundation on it, work with the existing product.
Powder

Apply dab makeup powder on the areas you usually get lots of oil. Don’t make it cakey. Dab the puff on your hand before you apply it on your face. This will make sure you don’t have excess powder on your skin.
Don’t forget to apply a moist setting spray followed by the sparkly highlighter.