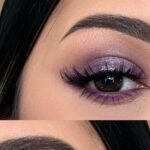
If you’re a beginner to eye makeup creating a cut crease eyeshadow look might seem a daunting task. The more you read to various tutorials the more confused and overwhelmed with the steps you become. After, spending days in mastering the cut crease eye look you’re still where you started, right?
Don’t be fret! In the feed, we have compiled for you a simple and straightforward guide on how to ace the cut crease eyeshadow look.
If you’re interested to know the easy and correct steps, read till the end!
Step 1: Groom Your Eyebrows

Nicely fill your eyebrows with light feather-like strokes. For filling your eyebrows use a shade lighter than your actual hair shade to achieve a natural effect.
Apply concealer around the eyebrow area to make them pop out.
When you’re using concealer around the eyebrow area make sure you’re using a light one, lighter than your actual skin tone.
Eyebrows play a huge rule role both in breaking and making your eye makeup look. A nicely shaped and filled eyebrows can make your eye look really stand out. So, don’t skip this step. Also, make sure you’re filling only the scanty parts of your eyebrow and not overdrawing it.
Step 2: Prep Your Lids

It’s very important to prep your eyelid. Take a concealer and apply it evenly to the eyelids. Use a damp beauty blender to blend the concealer properly. Make sure there are no harsh lines present. Remember blending is the key in eye makeup.
Now to set the concealer applied as an eye primer, use a setting powder all over the eyelid. Take a fluffy brush and with the help of it dust the setting powder all over the eyelid.
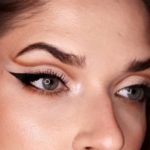
Step 3: Build The Crease

The next step is a base step for creating a cut crease eyeshadow look. All you have to do is take a brown eyeshadow and with the help of crease brush apply it on the crease. Blend the color nicely, to blend it properly take a clean crease brush and start moving the brush back and forth and then in tiny circular motions.
The area around the eyes is very sensitive so make sure you’re not applying hard strokes with the brush.
Now take a dark-colored brown shade and apply it to the outer corners in the form of a v, blend it using circular motions only, make sure the shade on the outer corner is darker than the shade you applied on the crease. Also, while blending you do not mix both the shades.
Step 4: Accentuate The Crease

The next step is to define the colors applied on the crease and outer corner of the eyes. For that, we would suggest you apply a concealer on your half eyelids. This will accentuate the crease and shades you have applied. Take a flat brush to apply the concealer.
Make sure if you see any harsh line you should smooth that out with blending. Blend the edges nicely.
Step 5: Focus On Your Eyelashes

Eyelashes are really very important in bringing out the eye look. We would suggest you apply falsies. Bigger eyelashes will really make your eye look stunning.
Take a nice quality pair of false eyelashes and apply glue over the band and wait for about 10 seconds before actually putting it on. For beginners, we would recommend you keep an eyelash holder with you that will help in placing the falsies accurately. Don’t forget to coat your lashes with loads of mascara.